Most of the time when editing this site you will be creating posts. Since most posts are brief and self-contained, you will usually create and edit them, then never come back to them. However, if you discover errors or need to add an update to a post, you can always return and edit it again later.
There is really nothing unique about creating and editing posts on this site, you can use any WordPress book to get oriented to the task. Here are just a few of the basics.
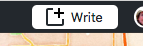
To create a post, click the “Write” button on the toolbar at the top of the screen. You will only be able to see this item if you have logged in to the site and have the authority to edit posts.
Enter the title and content you would like for the post in the appropriate fields.
- Make sure that if you paste text from another source you are either in “Text” mode or, if you are using
- “Visual” mode, you paste using the “Paste as Plain Text” tool circled in red,
 you may have to click the one circled in blue to see it).
 - Remember to keep it simple. Posts are fed into many contexts that you don’t control, so aggressive formatting will backfire. Try to stick to only headlines, bold, italic, and bulleted lists. Anything else, like centering text or coloring it with tools other than our shortcodes, should be avoided.
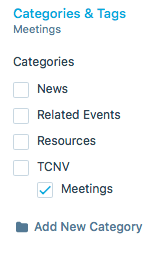
- Choose a category for your post, or more than one. Categories are an essential part of the “flow” of posts around the site. The category “Related Events” will get the post featured on the related events page, the category “Meetings” will get the post listed on the the meetings page, and so on. It is worth taking a moment to get this right.
- Tags have no immediate impact on your posts or how they are shown on our site, but feel free to add tags if you wish.
- Feel free to backdate or future date your post using the clicking on “Status” section in the right sidebar.
- Publish! Don’t forget to click the “Publish” or “Update” button to save your changes!
